Tuesday 3 April 2012

Photographing glass and chrome objects 16/03/12

During class we were to photograph glass and chrome objects. To do this we use white and black reflectors to remove and add shadows on the reflective material where needed. This gave us clean images and added depth.
Each photograph was also taken with the light source coming from behind the object, reflecters were used to fill light in on the front.

Camera: Canon 5D Mark II
Lens Focal Length: 80mm
ISO: 100
Exposure: 1/200 @ F11

Camera: Canon 5D Mark II
Lens Focal Length: 90mm
ISO: 100
Exposure: 1/200 @ F16

Camera: Canon 5D Mark II
Lens Focal Length: 105mm
ISO: 100
Exposure: 1/200 @ F16

Life size photography - 09/03/2012

Half Size 1:2
Exposure: 1/200 at F/11
Focal Length: 70mm
ISO 100
Lens: 50mm Macro
Sensor: 36 x 24
Extension Tube: 12mm & 24mm
Camera: Canon 5D Mark II

Life Size 1:1
Exposure 1/200 at F/11
Focal Length: 50mm
ISO 100
Lens: 50mm Macro
Sensor: 36 x 24
Extension Tube: 25mm
Camera: Canon 5D Mark II

Lens Testing - 09/03/2012

Task:

The class will divide into groups, each group will assist each other in working through the lens test task below and blog each of your findings/results of at least two lens tests by Week 5.

The task: Testing Two Lenses (or zoom settings)

  • Set up the targets on an appropriate wall
  • Set up the Tungsten lights as per the diagram
  • Ensure that the tripod is level
  • Ensure that the camera is level on all planes
  • Take images at all apertures to find the one that is sharpest
  • Please note that this task is also designed to find other lens aberrations, how many can you find in your lens/es?
  • Ensure this info is included along with images of your worst and best aperture.

The lens that i have decided to test is my canon EFS- 18-55mm, here are the results:


Exposure: 1/25 sec @ f5.6
Focal Length: 55mm
ISO 100
Lens: 18-55mm
Camera: Canon 60D
Chromatic aberration: blue fringing


Exposure: 1/13 sec @ f8
Focal Length: 55mm
ISO 100
Lens: 18-55mm
Camera: Canon 60D
 
Chromatic aberration: slight blue fringing.


Exposure: 1/16 sec @ f11
Focal Length: 55mm
ISO 100
Lens: 18-55mm
Camera: Canon 60D
 
Chromatic aberration: minor blue fringing on outer edge of image.


Exposure: 0.3 sec @ f16
Focal Length: 55mm
ISO 100
Lens: 18-55mm
Camera: Canon 60D
 
Chromatic aberration: none


Exposure: 0.8 @ f22
Focal Length: 55mm
ISO 100
Lens: 18-55mm
Camera: Canon 60D
 
Chromatic aberration: none


Exposure: 1/50 sec @ f4
Focal Length: 18mm
ISO 100
Lens: 18-55mm
Camera: Canon 60D
 
Chromatic Aberration: pincusion distortion and green and red fringing


Exposure: 1/30 sec @ f5.6
Focal Length: 18mm
ISO 100
Lens: 18-55mm
Camera: Canon 60D
 
Chromatic Aberration: pincusion distortion and green and red fringing
 
 
Exposure: 1/15 sec @ f8
Focal Length: 18mm
ISO 100
Lens: 18-55mm
Camera: Canon 60D
 
Chromatic Aberration: pincusion distortion and green and red fringing (only around the edges of the image).
 
 
Exposure: 1/6 sec @ f11
Focal Length: 18mm
ISO 100
Lens: 18-55mm
Camera: Canon 60D
 
Chromatic Aberration: pincusion distortion and green and red fringing (only on the outer edge of image).
 
 
After looking at the results shown above, the images determine that the highest quality point of the lens is at focal length 55mm and at an aperture between f16 and f22. At this pointthe lens has no chromatic aberrations or distortions. In the 18mm range the lens has continuous pincusion distortion, due to the lens being at a wide angle.

Introduction to the Hasselblad camera

This workshop is designed to give you practice using the Hasselblad MF cameras and the Phocus software, as well as to further develop your studio lighting skills.

Your client is a progressive professional company who has made their fortune based on the product you have selected, and they expect to soon become a major player in their field by implementing innovative practices and exhibiting expertise in their field. A company that thinks outside the square.
They require a number of portraits of their senior staff that project the desired image of a competent leader of an innovative company. Attributes such as flair, creativity and uniqueness, but also competency, ability and trust.
One of the portraits must also feature the product that lead their rise to success.

The images will be used in a Time Magazine article about the rise of the company to their current position in the industry, and their hopes for the future.


Task/Procedure

1. You are required to work in groups of two or three (No more).
2. You need to photograph the CEO and one other senior staff member (eg the inventor of the product, the chief financial officer, vice president etc)
3. You need to take TWO (2) different portraits as specified below :-
o One full length (or near full length) portrait,
o One close up / head & shoulders portrait.
· One must be in portrait format for the cover of the magazine, with space for the title banner at the top, and
· One portrait must be in landscape format for the double page title spread (with space for the title of the article).
· One portrait must also feature the product you have selected.
4. You may not leave anything set-up for another group, all sets are to be fully dismantled and everything returned to the store or prop room.
5. The shoot must be completed, the studio packed up, and the 2 images for your group submitted to the specified dropbox for a group discussion at the end of the classtime.

After completing these instructions these were the final portraits:
CEO of OLAY
Cover Magazine

Vice President of OLAY
Double Page

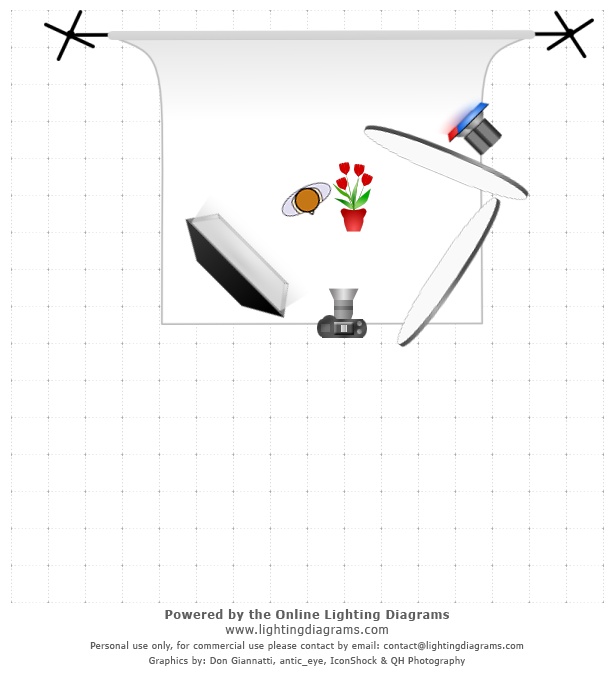
Vice President Lighting Set-Up

The lighting set-up for the Vice-President was on a black background, with a pinkish-purple colour hanging over the back light. With two reflectors one was for shading the right side of her face and one to lessen the main light and bring out more colour for the background.


CEO Lighting Set-Up

Similar set-up to before but this was on a white background with the colour pink reflecting onto the white backdrop bringing out a bright vibrant colour. Also with two reflectors one for reflecting the light onto the other side of the models face and one to separate the two lights.

Critique:
The cover photograph brings out positivity and energy because of the way the model is positioned and how clear and soft her skin is looking. Targeting the audience to try the product. The model takes up most of the cover with room left for a title which can be above head or around.
The double page photograph has left plenty of room for the seam going down with the model on the left hand side showing the Vice-president and her skin holding the product which is on the right hand side saying this is her product and this is all it takes to have beautiful soft skin. A bottle of Olay.

All student's in the group took turns in using the Hasselblads and Phocus software learning about these amazing camera's and creating these photographs.